
Last spring, I pulled my offset smoker out of the garage after a long winter — and my heart sank. The cooking grates were a deep orange, the inside walls had rust spots spreading like a bad sunburn, and the whole thing smelled like wet metal. For a second, I genuinely thought it was done. Toast. Headed for the curb.
But I didn’t toss it. And I’m really glad I didn’t.
If your smoker looks anything like mine did, don’t panic. Knowing how to reseason a rusty smoker is one of the most valuable skills any backyard pitmaster can have. Rust looks scary, but surface rust — the kind most smokers get after sitting in humidity or rain — is almost always fixable. With a little elbow grease, the right oil, and some heat, you can have that smoker cooking again like it’s brand new.
In this guide, I’ll walk you through exactly what to do: how to remove the rust safely, what oil to use, how to run the burn-in properly, and how to make sure it doesn’t happen again anytime soon. Let’s dig in.
Quick Takeaways Before You Start
- Surface rust on a smoker is normal and almost always reversible — don’t throw it out
- You’ll need a wire brush, food-safe oil, and a few hours of your time
- The seasoning process works by baking a thin layer of oil onto the metal (called polymerization)
- Flaxseed oil and Crisco are two of the most recommended options for seasoning
- After reseasoning, store your smoker with a quality cover to prevent future rust
- Deep pitting or rust-through is a different problem — but most rusty smokers don’t have that
Is Your Smoker Actually Worth Saving? (Here’s How to Tell)
Before you put in any work, you need to figure out what kind of rust you’re dealing with. Not all rust is the same, and this matters a lot.
Surface Rust vs. Deep Rust — What’s the Difference?
Surface rust is the most common type. It looks bad — orange, flaky, sometimes patchy — but it hasn’t eaten through the metal. You can scratch it with your fingernail and feel solid steel underneath. This is 100% fixable with reseasoning.
Deep rust (also called pitting) is when the corrosion has actually eaten into the steel and left small craters or holes. If you poke at a rust spot and the metal crumbles or feels soft underneath, that’s a deeper problem. Small pitted areas can sometimes be treated, but if there are actual holes in the cook chamber or firebox, you’re looking at repairs or replacement.
Here’s a quick test: grab a stiff wire brush and scrub a rust spot firmly. If solid metal is underneath, you’re good. If the metal keeps flaking and thinning, that section may be compromised.
What About the Grates?
Rusty grates are super common and almost always salvageable. Cast iron grates especially — they rust fast but clean up beautifully. Chrome or stainless grates are a bit trickier; if they’ve got heavy pitting, it might just be easier to replace them (they’re usually cheap). But in most cases, a good scrub and re-oil will do the trick.
When to Walk Away
Let me be real with you: if your smoker has rust holes in the cook chamber wall, smoke is going to leak out no matter what. Structurally compromised smokers run uneven temps and can be a fire hazard. In that case, repair or replace. But honestly? Most smokers with surface rust are perfectly fine once cleaned up.
What You’ll Need to Reseason a Rusty Smoker
Good news — you probably have most of this stuff already. Here’s what to round up before you start.
Tools for Rust Removal
- Wire brush — a hand brush works, but a drill-attachment wire wheel speeds things up significantly
- Steel wool or sandpaper (120-150 grit) — great for getting into corners and tight spots
- Scraper or putty knife — helpful for knocking off flaky chunks first
- Shop vacuum — to clear out rust flakes and debris
- Gloves and safety glasses — wire brushing kicks up particles, trust me on this one
Oils for Seasoning
You want a high-smoke-point, food-safe oil. According to Serious Eats’ breakdown of cast iron seasoning science, flaxseed oil creates an exceptionally hard, durable polymer layer — which is exactly what you want on smoker metal. That said, it’s not the only option. Here are your best bets:
- Flaxseed oil — forms the hardest coating, great for long-term seasoning
- Crisco vegetable shortening — a classic BBQ choice, easy to apply evenly
- Canola or vegetable oil — solid all-purpose option
- Lard or beef tallow — old-school and works great
Avoid olive oil and butter — both have too low a smoke point and will leave a sticky, gummy residue instead of a proper seasoned coating.
Cleaning Supplies
- Warm water and dish soap (for initial wash-down)
- Paper towels or clean rags
- Optional: white vinegar (natural rust dissolver for stubborn spots)
Step-by-Step: How to Reseason a Rusty Smoker
Alright, here’s where we actually get into it. Set aside a solid afternoon for this — the process isn’t hard, but it takes time. Most of that time is just the burn-in running, so you’re not working the whole time.
Step 1: Empty and Inspect
Pull everything out of the smoker — grates, water pan, drip tray, charcoal basket, all of it. Give the whole interior a good look in bright light. Take photos if you want — it’s satisfying to compare before and after. Identify all the rust spots and note whether they’re surface or deep (remember our test from earlier).
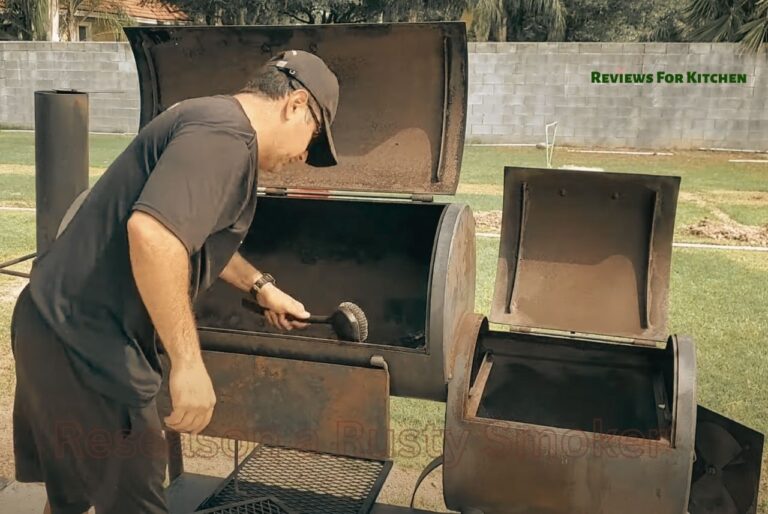
Step 2: Scrub Out the Rust
This is the most physical part. Using your wire brush, scrub all rusty surfaces firmly. Work in circular motions and don’t be shy about it — you need to get all the loose rust off. For grates, a drill-mounted wire wheel makes this significantly faster. For the inside walls of the cook chamber, a hand brush gives you more control.
Got spots that won’t budge? Soak a rag in white vinegar and lay it over the stubborn rust for 20-30 minutes. The acidity breaks down rust chemically. Then scrub again — it’ll come off much easier.
Once you’ve scrubbed everything, use the shop vac to pull out all the rust flakes and debris. You don’t want that stuff floating around when you light it up later.
This is also a perfect time to give the whole smoker a deeper clean while you’re in there. If you want to do a really thorough job, our guide on how to deep clean a pellet smoker inside and out covers some great techniques that apply to most smoker types — not just pellet grills.
Step 3: Wash and Dry Thoroughly
Give everything a wash with warm, soapy water. Yes, you can use dish soap — you’re about to burn it off at high heat anyway. Rinse well, then dry everything as completely as possible. Use rags or paper towels first, then leave it open in the sun or run a low fire for 20-30 minutes just to drive out any remaining moisture.
This step is critical. If there’s any moisture left under the oil layer, you’ll get steam pockets instead of a proper seasoned coating. Dry = good. Wet = bad.
Step 4: Apply a Thin, Even Oil Coating
Here’s where people mess up most often: they put on too much oil. You want a very thin, almost wiped-off layer — not a slick, glossy coat. Slather on your chosen oil (I use Crisco for big smokers because it’s easy to spread), then wipe most of it back off with a clean rag. The surface should look barely shiny, not wet.
Cover every surface: the inside walls of the cook chamber, the grates, the inside of the lid, the inside of the firebox if accessible. Don’t forget the underside of the lid — that’s where a lot of first-timers miss spots.
Step 5: Run the Burn-In
Get your smoker up to temperature — you’re aiming for around 250°F to 300°F. The idea is to run the oil through its smoke point so it polymerizes (hardens into a coating) onto the metal. You’ll see smoke coming off the smoker; that’s the oil burning in, and it’s totally normal.
Run it for 2-3 hours at this temperature. If you have a charcoal smoker, keep adding fuel to maintain the heat. For pellet or gas smokers, just set it and let it run.
After the first burn, let it cool down and apply another thin coat of oil. Run it again for another 2 hours. Two to three rounds of this builds up a solid base layer of seasoning. According to America’s Test Kitchen’s seasoning research, multiple thin coats always outperform one thick coat — the same principle applies to smokers.
Step 6: Let It Cool and Inspect
After your final burn, let the smoker cool completely with the vents cracked open. Once it’s at room temperature, take a look inside. The metal should have a dark, matte finish — not glossy, not sticky. If there are still tacky spots, you applied too much oil in those areas. Run another burn cycle and they’ll harden up.
Grates should look dark and slightly slick. That’s the polymerized oil doing its job.
Why Reseasoning Works: The Science Behind It
You might be wondering — why does rubbing oil on metal and heating it up actually protect anything? It feels almost too simple. But there’s real chemistry happening here.
What Is Polymerization?
When oil is exposed to high heat and oxygen, the fat molecules break down and bond together in long chains — a process called polymerization. These chains form a hard, plastic-like layer that bonds to the metal surface. That’s what the “seasoning” on a well-loved cast iron pan actually is: layers of polymerized oil, not oil itself.
On your smoker, this layer does two things. First, it creates a physical barrier between the steel and moisture, which is what causes rust. Second, it fills in microscopic pores in the metal surface, creating a smoother cooking environment over time.
Why Does Rust Form in the First Place?
Steel rusts through a process called oxidation — iron molecules in the steel react with oxygen and water to form iron oxide (rust). The thinner or more worn the seasoning layer, the easier it is for moisture to reach the bare metal and start that reaction.
This is why smokers rust fastest in humid climates, after rain, or when stored without a cover. It’s also why a smoker that gets used regularly and re-oiled after each cook tends to stay in much better shape than one that sits for months untouched.
Does the Type of Metal Matter?
Somewhat. Thicker steel (like what you find on higher-end offset smokers) takes longer to rust through and holds seasoning better. Thinner gauge steel — common in budget models — is more vulnerable. Cast iron components like grates are naturally porous and love to rust, but they also take seasoning exceptionally well and can last decades if cared for properly. The Kitchn has a great primer on cast iron care that translates well to smoker maintenance overall.
Pro Tips to Keep Your Smoker From Rusting Again
Reseasoning is satisfying work, but ideally you’re only doing a full restoration once. Here’s how to stay ahead of it.
Cover It Every Single Time
I know, I know — it’s a pain. But leaving a smoker uncovered between cooks is the fastest route back to rust city. A good, well-fitted cover keeps rain and humidity off the metal and dramatically extends the time between deep cleanings. If you haven’t picked one out yet, our best smoker cover for outdoor use buying guide breaks down what to look for by smoker type and climate.
Do a Light Re-Oil After Every Cook
Once your smoker has cooled down after a cook — not while it’s still hot — wipe the inside surfaces with a lightly oiled rag. Just a thin coat. This refreshes the seasoning layer and pushes out any moisture that snuck in. Takes five minutes and makes a huge difference over time.
Keep Up With Regular Maintenance
A smoker that gets regular attention never gets to the “rusty disaster” stage. Staying on a consistent cleaning and inspection routine is the real secret. If you want a solid framework for that, check out this smoker maintenance schedule with monthly and yearly checklists — it covers everything from ash removal to hinge lubrication.
Watch the Door Seal
Here’s something most people overlook: a warped or worn-out door seal lets in way more outside air and moisture than you’d think. That speeds up internal rust and messes with your cooking temps at the same time. If you’ve noticed smoke leaking around the door, our article on how to fix a warped smoker door seal walks through exactly what to do.
Store It Smart in the Off-Season
If you live somewhere with brutal winters and the smoker’s going into storage for months, give it a full oil-down before covering it. Think of it like winterizing a car — a little prep in the fall saves you a headache in the spring. Store it in a garage or shed if possible; even a covered porch is better than completely open exposure.
Common Mistakes People Make When Reseasoning a Smoker
I’ve made most of these myself at one point, so consider this the voice of experience.
Using Too Much Oil
This is the number one mistake. A thick, goopy layer of oil doesn’t polymerize properly — it just turns into a sticky, gummy mess that actually attracts debris. Thin coats only. When in doubt, wipe more off.
Not Getting Hot Enough
If your burn-in temperature is too low, the oil never fully polymerizes. You need consistent heat — at least 250°F, ideally 300°F — to do the job right. Check your thermometer calibration before you start if it’s been a while.
Skipping the Drying Step
Oiling over a surface that still has moisture on it is like painting over a wet wall — it won’t stick right. Always get the metal bone dry before applying oil.
Only Doing One Round
One burn-in coat is better than nothing, but it’s a thin foundation. Two or three rounds builds up a proper protective layer that’ll actually hold up through regular cooking and weather exposure.
Using the Wrong Oil
Olive oil smells amazing but has a low smoke point and leaves a gummy finish on smoker metal. Butter is the same problem. Stick to the high-smoke-point oils listed above and you’ll be fine.
Frequently Asked Questions
Can I cook on a rusty smoker without reseasoning it first?
Answer: Technically you can, but it’s not a great idea. Surface rust can flake off onto your food, and it affects flavor too — that metallic taste is real. More importantly, unaddressed rust keeps spreading. Take the time to reseason it properly and your food (and smoker) will both be better for it.
How long does it take to reseason a smoker?
Answer: Plan for a full afternoon — roughly 4 to 6 hours total. Scrubbing takes 30-60 minutes depending on how rusty it is. Each burn-in cycle runs 2-3 hours. If you’re doing two or three rounds (recommended), you might spread it across two days.
What’s the best oil to season a smoker with?
Answer: Flaxseed oil creates the hardest, most durable seasoning layer. Crisco vegetable shortening is the most popular choice in the BBQ community for its ease of application. Canola oil is a solid budget-friendly option. Avoid low smoke-point oils like olive oil or butter.
How often should I reseason my smoker?
Answer: A full reseasoning (multiple coats, long burn-in) is usually only needed after heavy rust, deep cleaning, or at the start of each season. For regular maintenance, a light oil wipe-down after every cook keeps the seasoning fresh and prevents rust from forming in the first place.
Can I use a pressure washer to clean a rusty smoker?
Answer: A light rinse is fine, but high-pressure washing can strip seasoning and force water into crevices. Stick to hand scrubbing with a wire brush and a simple wash with soapy water. It gives you more control and doesn’t blast away the good stuff you want to keep.
My grates are really badly rusted — should I replace them or try to save them?
Answer: Cast iron grates can almost always be saved with aggressive scrubbing and a few seasoning rounds — they’re incredibly durable. Chrome or stainless grates with heavy pitting are trickier; if the surface is deeply cratered or the chrome is flaking, replacement might be the smarter call. New grates are often inexpensive and can dramatically improve your cooking surface.
Your Smoker Isn’t Done — It Just Needs a Little Love
That rusty smoker in your garage? There’s a good chance it’s got plenty of life left. Reseasoning is one of those skills that feels intimidating the first time but becomes second nature fast. Scrub out the rust, dry it completely, apply thin coats of oil, run the burn-in, repeat. It’s really that straightforward.
I’ve brought back smokers that looked genuinely beyond saving — and some of them are still cooking great food years later. The key is not letting rust sit too long, staying consistent with maintenance after the fact, and investing in a good cover so you’re not starting from scratch every season.
Give it a try this weekend. You might be surprised how good that old smoker looks — and smells — once it’s properly seasoned and ready to cook. And when you fire up your first brisket on a smoker you restored yourself? That’s a genuinely satisfying feeling.
Have questions about your specific smoker type, or did this guide help you save one from the rust pile? Drop a comment below — I’d love to hear how it went.