I pulled a brisket off the smoker at 2 PM once. Dinner wasn’t until 6. I panicked, wrapped it in foil, and left it sitting on the counter — and by the time we sliced into it, the whole thing had gone cold, dry, and honestly a little sad. Twelve hours of smoking. Wasted.
That’s the day I learned about the cooler rest method. And honestly, it changed my BBQ game more than any other single technique.
If you’ve ever heard pitmasters talk about “faux Cambro” or “holding in a cooler,” this is exactly what they mean. Knowing how to choose a cooler for resting meat is one of those skills that sounds simple but makes a massive difference in your final result. The right cooler, prepped correctly, can hold a brisket at a safe and juicy serving temperature for 4-6 hours — sometimes even longer.
In this guide, I’ll break down exactly what to look for when choosing a cooler for meat resting, how to prep it properly, how long you can safely hold different cuts, and the mistakes that’ll cost you a great cook. Whether you’re doing your first brisket or you’ve been smoking for years, this one’s worth reading.
Quick Takeaways
- Any hard-sided cooler works — you don’t need an expensive one — but insulation quality matters a lot
- Always pre-warm your cooler with hot water before resting meat inside it
- Wrap meat tightly in butcher paper or foil before placing it in the cooler
- Meat must be above 140°F internally when you put it in — and should stay above 140°F the whole rest
- Bigger cuts like brisket and pork shoulder rest better than smaller cuts, which can overcook if held too long
- A quality cooler can hold meat hot for 4-6 hours; premium brands like Yeti can go even longer
Why Resting Meat in a Cooler Works (The Science Is Pretty Cool)
Before we get into picking the right cooler, it’s worth understanding why this method works at all. Because honestly, the first time someone told me to put my brisket in a cooler, I thought they were joking.
What Happens When Meat Rests
When meat comes off the heat, the muscle fibers — which have been contracting tightly from the heat — start to relax. As they relax, they reabsorb the juices that got pushed toward the center during cooking. That’s why a brisket sliced immediately off the smoker loses a flood of liquid on the cutting board, while one that’s rested properly holds most of those juices inside.
According to Serious Eats’ food science research on resting meat, the redistribution of juices during a proper rest makes a significant difference in perceived moisture and tenderness when you eat it — and that principle scales up to large BBQ cuts like brisket and pork shoulder just as much as steaks.
Why a Cooler Specifically?
You could rest meat wrapped in foil on your counter. But the ambient temperature of your kitchen will pull heat out of that meat pretty quickly, especially in a Canadian winter or an air-conditioned house in summer. A preheated cooler creates an insulated holding environment — the meat stays hot, the juices keep redistributing, and collagen keeps converting to gelatin even after the meat leaves the smoker. It’s essentially a DIY version of the commercial warming cabinets (called Cambros) that professional BBQ restaurants use to hold meat for service.
Is It Safe?
Yes — with one important condition. The USDA’s food safety guidelines require cooked meat to stay above 140°F to remain in the safe zone. If your cooler is well-insulated and properly preheated, a large cut like brisket will hold above 140°F for several hours with no problem. The risk comes from putting meat into a cold cooler (which drops the internal temp fast) or trying to hold small thin cuts that cool quickly. Use a probe thermometer to monitor — don’t guess.
What to Look for When Choosing a Cooler for Resting Meat
Here’s the honest truth: you don’t need to spend $400 on a premium cooler to rest meat well. But not every cooler is equal, and a few specific features matter more than others for this particular use.
Insulation Thickness and Quality
This is the single most important factor. Thicker insulation = longer heat retention. Cheap thin-walled coolers (the kind you grab for a beach day) lose heat fast and won’t hold your brisket hot for more than an hour or two. You want a hard-sided cooler with at least 2 inches of foam insulation in the walls.
You don’t need to spend a fortune, but mid-range coolers from brands like Coleman’s steel-belted line, RTIC, or Pelican perform well for meat resting at a fraction of the premium cooler price. If you already have a decent camping cooler sitting in your garage, there’s a good chance it’ll work just fine.
Size: Match the Cooler to the Cut
A cooler that’s much bigger than your meat actually works against you. Extra empty space means more air inside the cooler — and air cools down faster than the meat itself, pulling temperature out of the cut more quickly. You want a snug fit, with enough room to wrap the meat and tuck towels around it, but not a giant cavern of dead space.
Here’s a practical size guide:
| Cut of Meat | Approximate Weight | Recommended Cooler Size |
|---|---|---|
| Pork ribs (1-2 racks) | 4–8 lbs | 20–28 quart |
| Pork shoulder / butt | 8–12 lbs | 28–40 quart |
| Whole brisket (flat + point) | 12–18 lbs | 45–60 quart |
| Multiple large cuts | 20+ lbs total | 65–75 quart |
When in doubt, go slightly smaller rather than larger. You can always fill dead space with towels — which is actually recommended anyway.
Lid Seal and Latch Quality
A loose-fitting lid is a heat leak. Check that your cooler’s lid sits flush with a tight gasket and that the latches actually hold it closed firmly. This matters more for long rests (4+ hours). On premium coolers, the rubber gasket and pressure-fit lid are a big part of what you’re paying for — they seal significantly better than budget models.
Hard-Sided vs. Soft-Sided
For meat resting, hard-sided coolers outperform soft-sided ones in almost every situation. The rigid walls retain structural insulation better, the seals are tighter, and they hold their shape better when you’re stuffing a heavy wrapped brisket inside. Soft-sided coolers (like soft bags or lunch-box style) compress around the food and lose insulating air space. Stick to hard-sided for this purpose.
How to Prep Your Cooler for Resting Meat (Step by Step)
Even the best cooler won’t perform well if you skip the prep step. This is where I see a lot of people go wrong — they pull the meat, drop it in a cold cooler, and wonder why it’s lukewarm an hour later.
Step 1: Pre-Warm the Cooler
About 20-30 minutes before your meat comes off the smoker, fill the cooler with very hot tap water (or boiling water if you want to be thorough). Close the lid and let it sit. This brings the interior surface temperature up so it’s not pulling heat away from your meat the second it goes in. After 20-30 minutes, dump out the water and dry the interior quickly with a towel.
This step alone can add 60-90 minutes to how long your cooler holds temperature. It’s a small thing that makes a big difference.
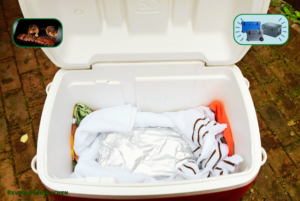
Step 2: Wrap the Meat Properly
Before it goes in the cooler, your meat should be tightly wrapped. The two best options are:
- Butcher paper (pink/peach): The preferred choice for brisket — breathable enough to prevent the bark from going completely soft, while still retaining moisture and heat well.
- Heavy-duty aluminum foil: Creates a tighter seal and retains more moisture and heat. Better for pork shoulder where bark preservation is less critical. Can make brisket bark a bit soft over a long rest.
Double-wrap if you’re doing a long rest. And if you’re using butcher paper, a layer of foil over the outside of the paper adds extra insulation without sacrificing the bark-breathing benefits of the paper. If you want to nail the wrapping technique from start to finish, our guide on how to wrap brisket in butcher paper walks through every detail.
Step 3: Add Towels Around the Meat
Old towels — clean ones — are your best insulating filler. Pack them around and on top of the wrapped meat to fill any dead space in the cooler. They add insulation and prevent the meat from sliding around. Old beach towels work perfectly for this. Don’t use your nice ones; they’ll get greasy.
Step 4: Close It Up and Don’t Open It
Once it’s in, leave it alone. Every time you open the cooler to check, you’re releasing a significant amount of heat. Trust the process. If you’ve pre-warmed the cooler, wrapped the meat well, and packed towels around it, you don’t need to babysit it. Set a timer and go do something else.
Step 5: Check Internal Temp Before Serving
Before you slice, probe the thickest part of the meat with an instant-read thermometer. It should still be above 140°F. If it’s dropped below that, you either had a very long rest in an under-insulated cooler, or something else went wrong. Above 140°F, you’re in the safe zone and ready to serve.
How Long Can You Rest Different Cuts in a Cooler?
This is the question I get asked most often — and the answer depends on the cut, the cooler quality, and how well you prepped everything. Here are realistic guidelines based on a decent mid-range hard-sided cooler that’s been properly pre-warmed.
Large Cuts: The Cooler Rest Really Shines Here
Big, dense cuts with lots of mass hold heat for a long time. These are the ideal candidates for a long cooler rest:
- Whole brisket (12-18 lbs): 2-6 hours confidently; some pitmasters push to 8+ hours with premium coolers
- Pork shoulder / butt (8-12 lbs): 2-5 hours easily
- Bone-in leg of lamb: 1.5-3 hours
Let me be real with you — the 6-hour brisket rest isn’t just a flexibility trick. A longer rest actually improves the texture. The continued collagen-to-gelatin conversion during those extra hours is part of what gives competition-style brisket that almost buttery, gelatinous quality. Don’t feel like you need to rush it.
Medium Cuts: Rest With More Caution
- Pork ribs (full rack): 30-60 minutes is ideal; 90 minutes max before texture starts to suffer
- Whole chicken: 30-45 minutes maximum — poultry holds heat less efficiently
- Pork tenderloin: 20-30 minutes; too long and it overcooks from residual heat
Small Cuts: Skip the Cooler Rest
Steaks, burgers, chops, and fish fillets don’t benefit from a cooler rest — they actually suffer from it. The residual heat in a sealed, insulated environment will push them past your target internal temp. For smaller cuts, a simple rest on a warm plate or cutting board tented loosely with foil is all you need. 5-15 minutes depending on thickness.