How to Caulk a Kitchen Sink : Easy Steps and Effected

How to Caulk a Kitchen Sink

Which thing do we use the most in our kitchens? Yes, without a doubt, it’s the sink. And caulks play a vital role in keeping them in good shape.From sealing air leaks to preventing the growth of mold and mildew, they are really necessary for our kitchen sinks. That is why it’s really important to know how to caulk a kitchen sink properly.

In this article, you will get to know everything about caulking and its importance for your sink. Then I will walk you through 12 easy steps to caulking a kitchen sink. We’ll close by showing which one will be perfect for you between caulking and sealing. Also get some tips and other information along the way.

Before we get to the main stuff, you should have a brief idea of caulk.

What is caulk?

Caulk is a material that is used to seal or fill gaps to prevent the passage of air and water. In your house, you will find different small holes, cracks or gaps on the doors, windows and of course, sinks. Caulking is basically done to seal these gaps. Therefore, air or water can’t pass through and do any harm.

For caulking , we use a caulk gun. Generally it comes in 10-ounce tubes. It usually looks like toothpaste, but it is made from latex and acrylic materials.

Not only the plumbers, but carpenters also use it to seal up different types of cracks or gaps.

Importance of Caulking for the Sink

Just like we said it in the first place. Caulking has a big role to play for the protection of our sinks.

Here are the reasons why you should caulk around a kitchen sink:

  1. Provides seal or fills the gaps.
  2. Prevents water & air
  3. Safety against mildew & mold buildup.
  4. Proper protection for the cabinets underneath.
  5. Good precaution against dirt.
  6. Keeps grime out of the seam.
  7. Reduces risks of leaks & wear on countertop

How to Caulk a Kitchen Sink : 12 Easy Steps

Caulks may wear out at a time. That’s why we should always keep an eye on it. Otherwise the entire sink might be damaged. Luckily, caulking the sink is not that hard. Many people think that they need a plumber or a technical guy to do it. But no, we do it ourselves and you can do it too.

Things You’ll Need

Follow these 12 easy & simple steps to caulk your kitchen sink:

Step 1

Simple steps to caulk your kitchen sink -Step1

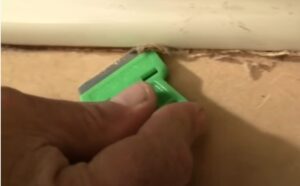
First you have to take out the old caulk. So take a razor blade (we used a flat one) and cut the old caulk sealant from the edge of your sink.

Be careful and do not go too deep. You might cut the countertop as well. Also remember to watch your fingers!

Step 2

Simple steps to caulk your kitchen sink -Step-2

The next step is to peel off all the dirty old caulk. It is our favorite thing to do. We love when we can get rid of the old caulk.

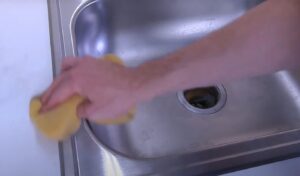
So, take as much as you can with the blade. But most of the time, that isn’t enough. So what we do is pour some warm & hot water in that area. You can use some dishwashing liquid as well. Then take a sponge or a small sharp knife to take out the rest of the caulk.

You have to be really patient and gentle in this step. So take your time and do it properly. Make sure you do not leave any residue. After that, give it some time and run a dry cloth around the sink. The kitchen sink should already look a bit shinier.

Step 3

For the Third step, you will need Isopropyl alcohol. You can get it in any of the hardware stores. So go and ask for some isopropyl alcohol or commonly known as rubbing alcohol. If you can’t get it anywhere, then you can try white vinegar or hand sanitizer as well. We have personally used both of them and they work fine just like the alcohol. Put some of the alcohol in a damp cloth and clean the joints properly. Make sure you get each of the places that need to be cleaned.

A clean surface is much needed to put the new caulk.

Step 4

After you’re done with the cleaning part, put some cold water in the sink.

Then wait for some time and let it dry completely.

Step 5

Simple steps to caulk your kitchen sink -Step5

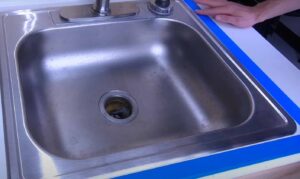
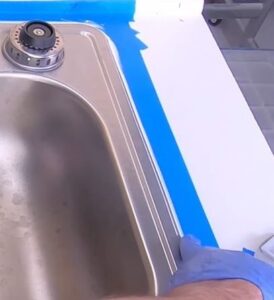
Now take some masking tape and put it on the sides of the caulk lines (all around the sink). Both sides of the caulk lines must be fully covered. Otherwise, the new caulk might get into the countertop later, and no one wants extra hassle.

So put the tape straight and check if you have got the entire area covered. Confirm that the tape is firm and as neat as a pin.

Step 6

Here’s the part when you get to use your caulking gun. But first, adjust the nozzle to the correct size based on the kitchen sink joints. We recommend you cut the nozzle at around 45 degrees. It gets the perfect shape.

Before putting it directly into your sink, test it on a random board or piece of paper. If you are getting it out in a perfect manner, then you are good to go. Otherwise, keep trimming!

Step 7

Simple steps to caulk your kitchen sink -Step7

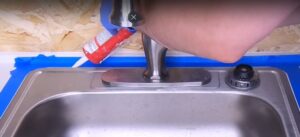
Point out the joints and then put the nozzle right there. Then what? Pull the trigger! Go around the sink slowly and put caulk in all the gaps and joints. The temperature should be 60°F to 85°F while applying caulk.

Here’s another tip: Do not panic if it looks a bit messy. Remember why we put masking tape on in the first place?

Step 8

Simple steps to caulk your kitchen sink -Step8

Now take some time and make certain that all the joints are filled properly with caulk. Don’t leave a single place.

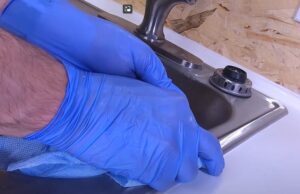
Then put two of your fingers together and run them down over the caulk.

Firstly, it will make sure that there isn’t any space left out, and secondly, it will give an overall better look.

Step 9

Simple steps to caulk your kitchen sink -Step9

Now it’s time to remove the masking tape. Do it before the caulk dries out.

But don’t be in a hurry! You may take out some of the caulk if you try to do it fast. So be as slow and gentle as you can.

Try your level best to remove it in one piece.

Step 10

Simple steps to caulk your kitchen sink -Step10

Some extra caulk left? Don’t worry. Take a damp cloth and wipe it out.

Once it had dried out, we had to use a scraper to clean it properly. If you face something similar, you can also try out a scraper.

Step 11

For the next 2 or 3 days, do not let anything liquid get into the joints or gaps. Let the caulk dry properly. You can check the owner’s manual or the labels to be sure about the dry out time.

Step 12

IT’S DONE! You have successfully re-caulked your kitchen sink. Once the caulking process is done, we always check if water drips down from the faucet. If it doesn’t, there are no leaks and you are good to go. Do not let the surrounding area get wet.

One more thing: give a routine cleaning to the entire sink after re-caulking the kitchen sink.

Difference Between Caulk and Sealant

Caulk and sealant are used for similar purposes. But hey, there are a lot of differences among them.

Here is a brief comparison between the two that will help you choose the most suitable one later on.

Caulk vs Sealant: Which One Should You Choose

This has been a question for ages. As you know, caulk and sealant are used for similar purposes. They are used to fill up cracks and gaps between different kinds of building materials. Even professionals use them interchangeably. 

That is why it is pretty common to ask, which is better, caulking or sealant? Well, it actually depends on multiple things. The comparison above should have given you a good idea of the differences between the two. Caulk dries really quickly, and they are paintable too. If you are thinking about painting, then acrylic caulk is definitely a good option for you.

Also, another thing we like about caulks is that they are really easy to apply and it helps with the time too. So it helps us avoid some extra hassle. Another thing you must keep in mind is that caulking has less water resistance. So, do not use caulk in a place where it will often come into contact with water.

On the other hand, sealant has more elasticity. If you have really big gaps or joints, then sealant will definitely be a better option. Not for our sink, but once we had really large joints in the windows and we had to use sealant. However, there’s one thing that we like a lot about sealants, and we have to use them for that. Of course, sealants have more water resistance and elasticity. This makes it extremely helpful against high temperatures and moisture levels.

So if you use it in a room with high moisture levels or if the temperature changes frequently in the place, then go for sealant. That is why you should decide which one you will need. It depends on what purpose you want to use it for. We chose caulk for our farmhouse kitchen sink because we like it paintable and it is extremely easy to apply. If you think about water resistance or high temperatures, then sealant is the right choice for you.

So think about your personal preference, then decide between the two.

Tips For Applying Caulk in the Kitchen Sink

  1. Prevent applying caulk over any kind of dust.
  2. Mobe the gun slowly while applying caulk.
  3. When you use acrylic caulk around the sink, use soap and water for cleaning.
  4. While applying caulk around the kitchen sink, the line should be no thinner than ¼”.
  5. Make sure you clean and dry the sink before applying caulk. 
  6. You can use vinegar, but we suggest you use rubbing alcohol.

Final Thought

We hope now you know how to caulk a kitchen sink. Trust us, the 12 steps are easy to do and if you can do it yourself, we would consider our efforts successful.

Keep your patience and be a bit careful while caulking the kitchen sink. Also follow the tips while applying caulk.

Other than that, if you face any trouble or have any queries, don’t forget to drop a comment.

Till then, Take Care!

You May Also Like To Know

Best Reviews

Jump To

Share for your family & Friends

Facebook
Twitter
LinkedIn
Pinterest
Tumblr
Digg

Related Articles

Leave a Reply

Your email address will not be published. Required fields are marked *