
Suddenly, some of Henry Green’s school friends come to her home. Sitting in the backyard, she has enchanting chats about unforgettable school memories. That’s thriving. Back of her mind, she is thinking of appealing to her friends with Stirred Fry Beef and Soy Sauce Fried Rice. So, she left the chat for a few minutes to prepare the food. But, after putting the meat into the slicer machine, it won’t slice. Because the slicer blade was dull, and she wouldn’t notice it.
Would you want that irritating, disgusting thing to happen to you? Of course, not. So it’s important to learn how to sharpen a meat slicer blade by hand. Is that too hard? Does it require heavy tools? Can anybody do it?
Get in touch with us till the end of our step-by-step guide on sharpening the meat slicer blade without cutting your finger and know the answers.
How To Know If The Meat Slicer Blade Is Dull?
Ideally, you need to define when your meat slicer blade becomes drab and needs sharpening. Generally, there is no fixed time duration, as it depends on how frequently you use the blade.
If you use the machine now and then, it will quickly lose its sharpness. On the other hand, if you use it rarely, it takes time to become dull.
However, there are two simple tricks to identify if the meat slicer blade is toned down or not.
- Initially, you have to force the meat into the blade to cut. That means it is a little dull.
- After cutting the meat, notice the quality of the slice. The blade needs sharpening if the meat slices are shredded and the edges are uneven.
Related Article: Using KitchenAid Mixer To Mix Meat – Effective & Easy 4 Steps
How To Sharpen A Meat Slicer Blade By Hand?
The thumb rule for sharpening the meat slicer blade is to rub it with a whetstone in a circular motion. Once you complete that, rub the edges with sharpening steel to sharpen the corners.
Sounds harsh!
Let me explain.
Before diving into the explanation, it’s better to provide you with a project overview with the required cost, time, and skill. So you can electrify your brain to do that.
Project Overview
- Estimated Cost: $20-$30
- Required Time: 10-15 minutes
- Required Skill: Beginner
Step 1: Preparation
You probably have read or heard the name of the world-famous book “The 7 Habits of Highly Effective People” by Stephen Covey. Here, the no.7 habit is sharpening your saw, and now you are sharpening your slicer. Sounds similar!
You should first prepare the tools to jump-start the main task smoothly. This is a list of tools you need
- A pair of cut-proof hand gloves (To protect your fingers)
- Goggles (To protect your eyes)
- A Whetstone and sharpening steel (To sharpen the blade)
- A wood piece (To elevate the blade while sharpening)
- A marker (To mark the outer line of the blade)
- A clean rug and soapy water (To clean the blade)
- Blade sanitizer (To ensure sanitation)
Step 2: Collect the tools
If you already have all those things at home, that’s great. But, if you don’t have one, it’s time to go shopping. You can collect them from your nearest hardware shop or online.
However, your meat slicer machine usually has a sharpening stone to sharpen the blade. If your machine has it; congratulations! It saves your Whetstone buying cost.
But, unfortunately, if it won’t. You have to buy it. For your kind information, the whetstone sharpening ability is measured by grit. You’ll find a whetstone with 3000 to 8000 grit in the market.
- You have to choose a whetstone with 4000 or 6000 grit because all the grits’ whetstone isn’t useful for meat slicer blade sharpening.
- Apart from the sharpening stone, you can choose other tools per your preference. But, keep in mind your safety.
Related Article: Is It Cheaper To Grind Your Own Meat! – Cost & Taste
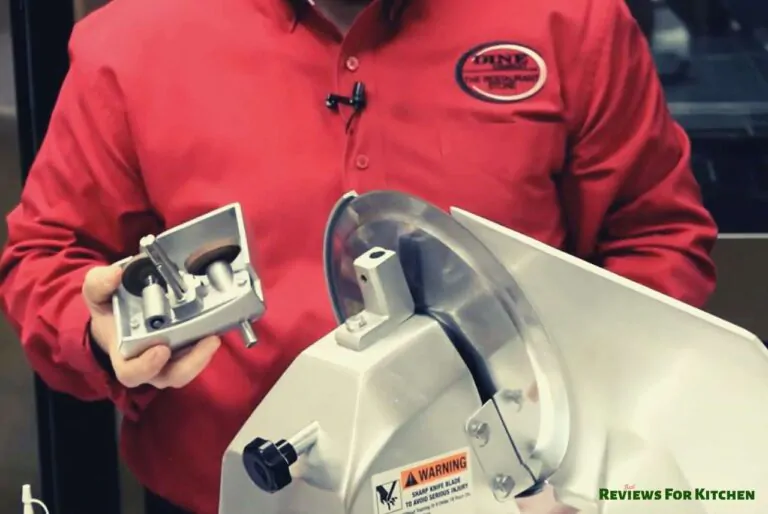
Step 3: Remove the blade from the machine
As your mission is to sharpen the blade by hand, without removing the blade, it’s not possible. So you should remove the blade. To do that, first read the user manual.
- Check the machine’s power cord and disconnect it.
- Ensure the slice thickness knob is set at zero.
- Make the machine surrounding clutter-free and food contamination free.
- Ensure the machine is on a solid table with the right working height to handle it appropriately.
- Put on your safety gear.
- Unscrew the blade carriage knob and pull the carriage towards you.
- Unscrew the knob at the rear of the blade.
- Lift the blade guard and remove the blade.
Step 4: Sharpen the blade
Now, you have reached the main step of your task. You have to sharpen the blade in two ways. The first one is with a whetstone and the second one is with sharpening steel.
Because whetstone can sharpen the flat edges of the blade but not the corner edges. The sharpening steel, on the other hand, can sharpen the corner edges, but not flat edges. So you should do the job in two ways, and we’ll discuss the ways separately for your convenience.
Sharpening with whetstone
- Keep the blade flat or front side on a 2″×4″×6″ dimensional wood piece to elevate it slightly. (There is no fixed dimension of the wood piece, we show the dimension to give you an idea. You can also use any other solid thing.)
- Mark 2-3 inches of the blade with the marker.
- Pick the whetstone in your right hand and tightly hold the plastic centre of the blade with your left hand. Now gently rub the whetstone on the blade in a small circular motion.
- Rub for 30-60 seconds at a time.
- Check the blade, and if you find the marker mark has vanished, your blade is sharpened.
- If not, again rub the whetstone until the mark has vanished.
- By following the process, sharpen the entire blade.
Sharpening with sharpening steel
- Flip the blade upside down.
- Take the sharpening steel and run it back and forth in one of the sections of the blade for 30 seconds.
- If you find the section’s edge is sharp enough, move forward to the next section.
- By following the process, complete running the sharpening steel in every section.
Step 5: Check the blade’s sharpness
After completing sharpening, it’s better to check its sharpness before reinstalling it in the machine.
- Keep a tomato on your chopping board and carefully cut it with the blade.
- If the blade can smoothly cut the tomato without extra pressure, it indicates it is properly sharpened.
- If not, it needs more sharpening. In that case, following step 4, sharpen it again.
Related Article: Know What Happens If You Eat Bad Ground Beef To Avoid Health Risk
Step 6: Clean the blade
As you sharpen the blade, it is full of dust, debris, and other metal parts. So you have to clean it to remove all those things. Remember, the blade is now too sharp to cut your fingers. Be careful when cleaning it.
- Make soapy water into a bath mug.
- Pour the soapy water on the blade.
- Gently wipe the blade with the clean rug.
- Check whether your face reflects on the blade or not.
- If yes, it’s spotlessly clean.
- And if not, again wipe the blade to make it spotless.
- After that, rinse the blade with clean water and wipe it with a dry cloth.
Step 7: Disinfect the blade
You’ll use the blade to cut meat, so ensuring there are no grams and bacteria on the blade surface is mandatory. Using a disinfectant spray or rubbing alcohol is the ultimate way to kill the bacteria if there are any.
- Spray some regular disinfectant on the blade’s front side and wait until it dries.
- Now, flip the blade. Again spray the disinfectant on the back side and let it dry.
Step 8: Reinstall the blade in the machine
So, it’s time to reinstall the sharp blade in the meat slicer machine.
- Carefully grab the blade, and set it into its place.
- Tighten the screw to secure the blade’s position.
- Reverse the blade removing process to get the slicer ready to slice the meat.
Step 9: Checking the slicer
Since you removed and reinstalled many tools of the machine, it’s wise to check that everything works flawlessly as before.
- Check the power cord, and connect it to a power source.
- Pick a solid chunk of meat and press the machine’s ‘on’ button to slice the meat.
- Hopefully, everything is ok, and you can slice the meat as you require.
- If not, identify the issue, and fix it.
You can also read: What Size Grinder Plate For Hamburger | 3 Best Recommendation
Some Tips To Keep Your Meat Slicer Blade Sharpened
Manually sharpening the meat slicer blade is a tedious and time-consuming task. Even frequently sharpening the blade makes the blade smaller than its frame. Because every time you sharpen the blade, it decays a little. In that case, following some tips will help you to avoid this hassle and keep it durable.
- Clean the blade each time you use it to avoid sticking the meat with it and kill bacteria.
- Frequently, apply sharpening oil on the blade. It’ll keep the blade shiny and prevent moisture attaching that creates rust and corrosion. On top of that, the blade will remain sharp for longer.
- Properly use the blade guard on the blade when not in use, and store the machine in a dry space. Because the air on the wet surface contains moisture, it reacts with the blade and creates rust.
However, if unfortunately you find your meat slicer blade smaller than its frame, you should better grab a new meat slicer. But, don’t have much of a budget. You can check out another post where we discuss top rated yet cheap meat slicers.
Dazzle The Slicer Blade By Sharpening
Sharpening your meat slicer blade means faster your meat-cutting process. Sharp the blade to ensure safety to avoid injuring yourself.
A sharp meat slicer blade means slicing the meat is fun. Cooking the meat slice will also be enjoyable to appeal to the guests with zesty-looking and tasty flavored beef.
Our Other Product Comparisons
- Best Food Processor For Emulsifying Meat With Buying Guide
- Best Meat Slicer For Jerky | Ensure Thinner But Faster Slicing
- Best Meat Grinder Attachment For KitchenAid | Snuggly Fit & Faster Operation
- 5 Best Meat Slicer Under $100 Without Compromising Quality
- Best Meat Grinder For Wild Game – Deer, Elk, Bison, & Moose
- How To Slice Cooked Meat Thin Without A Slicer-5 Easy Steps
- What To Mix With Venison When Grinding | Know Exact Fat & Meat Ratio
- Minced Meat vs Ground Meat | Difference, Similarities & Price
- Lem Vs Cabelas Meat Grinder | Here’s The Best Unbiased Answer