Does it seem to you installing your ductless range hood is challenging due to its size, weight, and dimensions? Yes, I’m also thinking like you. But it’s a simple project and you can easily tackle it on your own. Thinking… How? Where to start? What do I need? And many other related things. In this blog post, I’ll take you through the step-by-step guides to installing a ductless range hood. I’ll cover everything that you need to complete your task from scratch to finish. So if you’re ready to enjoy a fresher, cleaner, and more competent kitchen with a ductless range hood, read on…
How To Install Ductless Range Hood?
There are three types of ductless range hoods; under-cabinet, wall mount, and Island mount. And I don’t know which type you won.
So, for your convenience, I’ll cover all three installation processes within three sections. As a result, you can get the exact solution that you’re looking for. So, let’s get to the points.
Section A: How To Install Ductless Under-cabinet Range Hood
If you have cabinets in your kitchen, that means you have bought an under-cabinet Range hood. And most homeowners in the USA prefer this type of kitchen. So, first I’ll share the simple steps on how you can install your under-cabinet hood with your partner’s help.
Here’s A Basic Requirement
- Time Requirements: Around 45-60 minutes
- Skill Requirements: Beginner
- Tool Requirements: Basic DIY
Step 1: Unboxing & Functionality Checking
Unbox your range hood and keep it on a mat to avoid scratching. If the hood comes with installation tools, arrange them beside it. Now, plug the hood with your electric socket to ensure its function. It helps you to avoid the further hassle of non-functionality.
Step 2: Mindfully Read The User Manual
Every kitchen range hood comes with a user manual and guide. There you’ll get all the information about the hood. In this manual, you will also find the installation guidelines with diagrams. You must read it to get proper procedures. There you also find an installation diagram for visualization.
Step 3: Preparation
Once you read the manual, you should prepare before jumping into the main installation process. Arranging materials and measuring the hood installation space involves preparing work.
You’ll need
- Mounting screws
- Screwdriver
- Measuring tape
- Pencil
- Drill machine
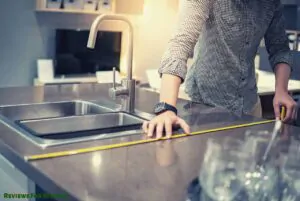
Once you arrange the tools, measure the space under your cabinet with the measurement tape. Ensure the area is as wide as your hood.
Step 4: Mark Mounting Screws Location
Ask help from your partner to hold the hood where you want to install it. When they hold the hood in the installation position, mark the space mounting screwing space with a pencil. Then, tell them to leave the hood.
Step 5: Install the Mounting Screws
It’s time to drill the marked cabinet location with a drill machine to prepare the space to attach mounting screws. Then, attach the mounting screws keeping a 1-inch space with a screwdriver.
Step 6: Install the Range Hood
Again, ask your partner to hold the hood on that installed space like before. Then, tightly secure the mounting screws with the hood.
Step 7: Filters Installation
After that, attach the carbon filter inside the hood, rotating it clockwise. Finally, install the mesh filter of the hood before the electric connection.
Step 8: Plug In & Use
Plug the hood’s electric wire with your grounded outlet. Then, press the On switch of the hood to run the motor and test the fan, light, and filter functionality. Once everything is ok, congratulations, you have successfully completed the job.
Section B: How To Install Ductless Wall Mount Range Hood
Don’t you have cabinets in your kitchen? That means, you have bought a wall mount range hood. No issues; here’s how you can install it with ease.
Here’s A Basic Requirement
- Time Requirements: Around 1 to 1.5 hours
- Skill Requirements: Beginner
- Tool Requirements: Basic DIY
Step 1: Unboxing & Reading User Manual
First, unbox your range hood, check its functionality and read the user manual.
Step 2: Tool Arrangement
After that, you have to prepare the required tools. Such as
- Measurement tape
- Wall anchors/brackets
- Drill machine
- Screws
- Plastic mallets
- Hammer
- Screwdriver
- Sturdier ruler
- Pencil
Step 3: Mounting Place Preparation
Measure your wall with a measuring tape where you prefer installing the hood’s bottom part. Grab the mounting bracket/anchor and set it over the wall to mark its screwing space. Now, drill the marked area with a power drill.
Step 4: Installing The Wall Anchor
Insert 3 mallets on the screwing space with a hammer before screwing the wall anchor with the screws. As they’ll make sure of tight wall anchoring to hold the hood.
Step 5: Get The Hood Ready
Connect the flapper inside the hood, where the polluted air will vent from the kitchen. Next, hook your range hood onto the wall anchor you installed.
Step 6: Install Aluminum Vent Pipe
Mark a longer vertical line in the middle of the hood with a measuring tape and sturdier ruler. Install the aluminum vent pipe on top of the opening of the hood.
Step 7: Prepare Hood’s Chimney To Install
Pick the shorter bracket and connect it to the end of the hood’s chimney. However, if you use a chimney extension, you should use a more extended bracket measuring the length where the hole of the chimney meets the frame.
Measure the chimney and get its length. Then mark the size on the wall top of the hood and draw a horizontal line with a sturdier ruler. Grab another wall anchor/bracket and keep its screwing space.
Again drill the screwing holes, and insert mallets with a hammer. Now, secure the screws with a short screwdriver.
Step 8: Chimney Installation
Place the chimney on top of the range hood, slide the top chimney up, and hook it onto the brackets. Using smaller screws, secure the full chimney in place.
Step 9: Filter Installation & Checking
Finally, clip on the oil tray, install the carbon filter, and the mesh filters with the hood. Connect the wire with an electric socket, and run the hood for 2-3 minutes to check it. If everything is ok, you have completed the job.
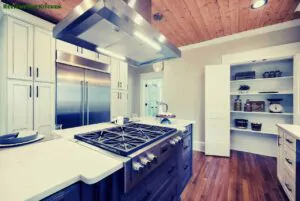
Section C: How To Install Ductless Island Mount Range Hood
Now, it’s time to let you know the simple and easy-to-follow Island mount range hood installation process.
Here’s A Basic Requirement
- Time Requirements: Around 1-1.5 hours
- Skill Requirements: Beginner
- Tool Requirements: Basic DIY
Step 1: Unboxing & Reading the User Manual
As the first two types of range hood installation, you have to inbox your inland mount hood and read the manual.
Step 2: Tools Arrangement
You’ll need some essential DIY safety equipment and tools to install the hood. So, first, manage the tools and keep them aside from your workstation. The required tools are
- Measurement tape
- Safety hand gloves
- Safety goggles
- HVAC foil tape
- Pencil
- A wallboard saw
- Drill machine with Phillip head bit
- Screws & washers
Step 3: Mark the Location
Wearing the safety equipment, grab the ceiling plate of the hood. Place it onto the ceiling where you want to install it. Mark the screwing place with a pencil.
Step 4: Cut the Duct Hole
Using a wallboard saw, cut a 6 inches round hole within the dimensions of the ceiling plate. Insert 2*4 T-shaped wood support into the duct hole if ceiling studs aren’t available. You must place the support above the holes in the ceiling plate to ensure the installation is as sturdy as possible.
Step 5: Install the Ceiling Plate
Drill 4 holes in each corner of the ceiling plate that you marked before. Now, secure the screws with washers to install the ceiling plate with the ceiling. When installing the screws, ensure they will go into the T-shaped wood support or the studs in your roof.
Step 6: Install the Ceiling L-brackets
Bolt the 4-L brackets one by one to the ceiling plate with nuts. After that, secure the lower 4-L brackets with the upper 4-L brackets with bolts and nuts. When installing the lower brackets, ensure your desired dropdown length.
Step 7: Install the Aluminum Pipe
Thread the aluminum pipe from the range hood up through the duct hole. Then, connect it with your exacting ductwork.
Step 8: Install Chimney & Hood
Carefully slide the inner and outer chimney cover with the ceiling brackets over the support frame. Now, tell your partner to lift and position the range hood below the support frame.
And in the meantime, attach the included duct pipe to the air damper and flapper of the range hood. You can use HVAC foil tape for this work. Slide the both chimney covers down onto the hood unit.
Before completing the hood installation, thread the electrical plug into your ceiling, where you already have an electric outlet. If you don’t have the outlet, skip this process, and screw the hood with the chimney cover.
Step 9: Filter Installation & Checking
Attach the carbon filter with the hood’s motor. Then, attach the mesh filters with the hood and connect its plug with your electrical outlet. Run the hood, check its fan, light, and other functionality
Some Useful Tip To Install Ductless Range Hood
No matter which types of ductless hood you install. Following some tips will help you to avoid many hassle, and ensure proper installation.
- When drilling the screws location, ensure it’s evenly leveled to a well-decorated hood installation like a pro.
- Tightly secure the screws, bolts, and other attachments. Because, the hood will remain mounted over these.
- Keep the hood at least 18-24″ above the primary heat source. So you can reach the hood with ease when using it.
- Handle the hood with proper caution not to scratch it. And don’t try to handle it alone, if your hood is heavyweight.
Frequently Asked Questions
Do I need to hire a professional to install a ductless range hood?
No, you don’t need to hire a professional to install a ductless range hood in most cases. Because any homeowner with essential DIY skills can tackle the job. However, if you lack DIY skills or aren’t comfortable with electrical tasks. Handover the job to a professional for the best outcome is better.
How often must I replace the filters in my ductless range hood?
Every 6-12 months can be the ideal time to replace the filters in your ductless range hood, depending on your cooking frequency. Or when you discover the filters are dirty and fail to purify the smoked air.
Can I convert a ducted range hood to a ductless range hood?
Yes, many ducted range hoods are available that can be converted into ductless with attaching charcoal filters. If you have any of those hoods, you can convert them.
Final Verdict
Installing a ductless range hood is a project you can tackle with some essential tools and knowing the process.
So, there is no need to hire a professional and spend your money on installation costs. Instead of following our step-by-step guide, do it yourself. And the bucks that you spend on the professional, treat your family with favorite foods. It’ll create happy and sweet memories.
You May Also Like to Know
- Best Ductless Range Hood With Charcoal Filter To Enjoy Fresh Air
- Best Ductless Under Cabinet Range Hood For Convenient Cooking
- Best Ducted Range Hoods For Gas Stoves | Reviews & Buying Guide
- 5 Best Ceiling Mount Range Hood For Your Kitchen
- 5 Best Vented Range Hood For Your Healthy Kitchen Environment
- 5 Best Recirculating Range Hood To Smoke Free Your Kitchen
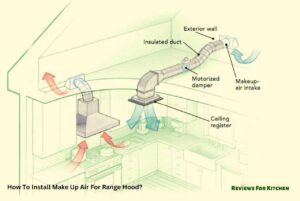
- How To Install Make Up Air For Range Hood?
- How To Clean Range Hood Fan Motor For Uninterrupted Efficiency & Freshness
- How To Clean Range Hood Mesh Filter | A Step-by-Step Guide
- How To Install a Range Hood on a Slanted Ceiling
- Fixing Range Hood Making Noise When Off | Make It Silence
- How To Clean Range Hood Duct | Easy Steps For Spotless Kitchen