Feeling overwhelmed on how to install make up air for range hood. Thinking… Does it require professional help? Or can you tackle it alone? What if I said there is no need to hire a professional to install your make up air kit with your kitchen range hood?
Because you can install the kit with DIY skills. And through this post, I’ll guide you with an easy-to-understand process that takes not more than one hour. So, let’s check out…
How To Install Make Up Air For Range Hood?
Before going to the main discussion of the make up air installation process…
It’s better to know about the make up air kit, and when you need the kit briefly. So that, if you are new about the term, you can relate my further words.
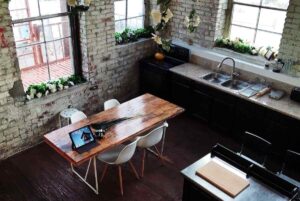
What Is Make Up Air For The Range Hood?
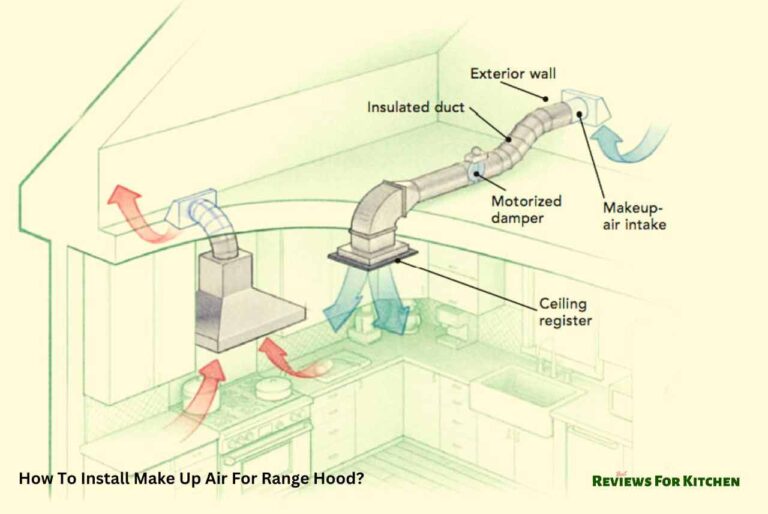
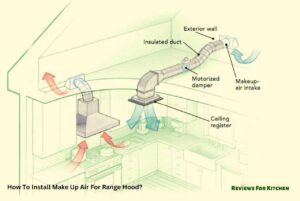
Reading the name of the kit, you may understand the primary purpose of this kit. However, a make up air kit is a set of equipment. These will help maintain fresh air into the kitchen during low air quality. The kit will involve a duct, a damper, and a range hood to ensure better airflow and quality.
When Do I Need To Use Make Up Air?
So, do you always need make up air?
Not at all.
There are some specific situations when you should use make up air with your range hood. Otherwise, it’s not mandatory to use this kit. Here are some situations, when you must use the kit.
Situation 1: Having a Powerful Range Hood
The power of range hoods is measured by the term CFM or cubic feet per minute. This means the more powerful the hood is, the more CFM it has.
According to the American Legal Publishing website, if your range hood is more than 400 CFM. You should install a make up air kit with it. The hood with CFM>400 sucks lots of air from your home, which may create a lack of air pressure.
Situation 2: Using Gas Cooking Appliances
Using gas cooking appliances, and running the range hood will cause back-drafting of carbon monoxide. And this gas may be dangerous for your health due to low indoor airflow. Installing the make up air kit with the range hood will ensure fresh air replacement to maintain a healthy living environment.
Situation 3: No Organic Ventilation Available
If your home is too small with no organic ventilation system. That means when you run the hood, it’ll suck the polluted air. But, due to no natural airflow in your house, the air pressure may be harmful in an anemometer. So, you should install a make up air kit.
Situation 4: Required By Local Building Codes
There are some cities in the USA where using a make up air kit with the range hood is mandatory by local building codes. Some of these cities are Chicago, Seattle, and Denver.
However, this restriction mainly applies to commercial kitchens that require more than 90% venting capacity.
So, if your kitchen is used for commercial purposes (like restaurants). You should install the air make up kit following the local building codes.
A Guide To Install Make Up Air For Your Range Hood
Installing a make up air with your range hood isn’t a complicated task. Just having some DIY hardware tools, a bit of electrical skill, and one hour of time investment is alright. Let’s see the steps, how you can do it.
Step 1: Tool Arrangement
The first step for installing your make up air kit with your range hood is arranging some required tools. Such as
- Make up air kit
- Measuring tape
- Duct tape
- Screws & Screwdriver (Optional)
- Saw
- Power Drill
- Caulk gun & caulk
Step 2: Range Hood Preparation
If your range hood is installed and used, it is connected to electricity, right? So, you have to disconnect the electric supply of the hood to ensure safety.
- Turn off the electric switch of the hood.
- Remove the electric plug of the hood from the outlet.
- Keep it in a secure place to avoid installation hassle.
Step 3: Select Installation Location
Installing the make up air kit anywhere on your range hood is not wise. It may fail to provide proper air improvement for the wrong placement.
- So, find out the ideal hood location to install the make up air.
- However, most users recommend placing it on your exterior wall or roof for easier installation with the duct.
- If you want to follow most people, select your wall or roof position, that is convenient for you.
Step 4: Mark Hood & Damper Joining Location
Now, it’s time to select the location to install the damper with the hood. To do that,
- Measure the damper distance from the range hood. (That you find best, as there is no fixed distance)
- Mark the location with a pencil.
Step 5: Connect the Hood & Damper
In this step, you have to connect the hood with the damper.
- Cut the duct hole using a saw.
- Then, run the duct to the outside through the wall or roof.
- Connect the duct and damper with screws or duct tape. (That is available)
Step 6: Seal The Gap
There may be gaps between the damper and hood during connection. Since the air damper will work with electricity, it’s essential to ensure no gaps between them. It’ll help to prevent air leakage and improve the efficiency of your make up air kit.
- Pick a caulk gun and insert a caulk tube in it.
- Now apply the caulk around the duct, damper, and hood connected wall or roof area.
- Leave the space for a few hours until the caulk is cured.
Step 7: Test the Make Up Air
Once you complete all the above steps, you must run the make up air kit to test its functionality.
- Connect the plug of the hood with your electric socket.
- Press the ‘On’ button of the hood.
- Run the hood at high speed.
- Check the airflow through the duct.
- If you find the air quality of your home has improved. That means the make up air kit installation is ok, and it works effectively.
Dangerous Consequences Not Installing Make Up Air For Range Hood
There is no chance of lightly taking a make up air installation for the range hood. Because you may have to face some of the harmful consequences of this. Such as
Feeling Suffocating
When your kitchen range hood sucks air from the kitchen, the overall air pressure of your home will reduce. As a result, your family members may feel suffocating due to low/negative air pressure.
Health Problems
Negative indoor air pressure may also pull outdoor pollen, car exhaust, and other allergens into the home. So, inhaling this polluted air may cause cough, sneezes, headaches, dizziness, and other health issues in the long run.
Increased Energy Cost
Your range hood may pull air from different areas (water heater, furnace, and other combustion appliances) of your house. So air quality drops from these spaces, and they need to work harder to compensate. As a result, your energy cost will increase.
Make Up Air Kit Installation Tips & Tricks
Knowing some DIY hacks will help you perform your DIY job more efficiently. So, you can do the job in a way that is easier, faster, and smarter.
Here are some tips and tricks for your convenience installing the make up air kit with a range hood.
- Choose a make up air kit for your range hood that fits it well according to its size and CFM.
- Know about your local building codes and their instructions about installing the make up air kit.
- Before jumping into the work, must read the manufacturer’s instructions, as it’ll help you clear any confusion if you have and avoid any risk.
- If you don’t have DIY skills or feel nervous handling electricity. You shouldn’t do it. Instead, hire a professional.
- After installing the make up air kit, don’t forget it. Clean the hood and the make up air kit regularly, at least once a year, to prevent blockages.
Related articles
Frequently Asked Questions
Is it necessary to install make up air for my range hood?
Yes. If your range hood is over 400 CFM. You should install a make up air kit for your range hood.
Can I install the make up air kit myself?
Yes. If you have basic DIY knowledge and skill in ductwork and electrical wiring. You can install the make up air kit yourself.
Can I use an existing vent for make up air?
No, you can’t use your existing vent for the make up air. Instead, you should use a separate duct for your make up air installation.
Can I use a make up air kit for a downdraft range hood?
Yes, you can use a make up air kit for your downdraft range hood. But in that case, the make up air kit installation process may vary.
How much does a make up air kit cost?
The price of a make up air kit for range hood may vary from brand to brand and size to size. However, it may cost you approximately $500 on an average.
Final Verdict
Installing make up air for your range hood is a better, healthier, and safer option to ensure quality indoor air pressure.
As the overall installation process is simple and convenient. Do it yourself following our guidelines and level up your confidence as DIYer.
Don’t forget to let me know your experience hitting the comment section. I’d love to read your comment.
You May Also Like to Know
- Best Ductless Range Hood With Charcoal Filter To Enjoy Fresh Air
- Best Ductless Under Cabinet Range Hood For Convenient Cooking
- Best Ducted Range Hoods For Gas Stoves | Reviews & Buying Guide
- 5 Best Ceiling Mount Range Hood For Your Kitchen
- 5 Best Vented Range Hood For Your Healthy Kitchen Environment
- 5 Best Range Hood For Chinese Cooking To Remove Heavy Grease & Smoke
- 5 Best Under Cabinet Ducted Range Hood for Your Perfect Kitchen
- Convertible Vs Ducted Range Hood | Which To Choose
- How to Test Range Hood Suction | Methods And Quick Guide
- How To Install Ductless Range Hood | Under-cabinet, Wall & Island Mount
- How To Clean Range Hood Duct | Easy Steps For Spotless Kitchen