
Do you want to replace your Delta kitchen faucet? If you’ve broken the sprayer or your faucet got clogged with different build-ups, it might be time to know on how to replace delta kitchen faucet sprayer hose
If you don’t know how to replace Delta kitchen faucet sprayer hose, you’re at the right place! Because today we’re going to provide you with a tremendously comprehensive guideline that will explain the entire process in a highly detailed manner.
While you replace, try to keep in mind the water quality in your area. If it’s not that good, make sure you’re getting a specially designed faucet with purifying properties. So, you won’t have to replace it time and time again.
How to Replace Delta Kitchen Faucet Sprayer Hose
We’ll show you the entire procedure in a step by step fashion. As a result, it’d be effortlessly simple for you to grasp the complex process fast. Let’s begin our journey!
Try this Simple Technique Before Starting the Process
Often mine build-ups on the nozzle can create sprayer issues. You can try getting the sprayer head submerged in a warm vinegar solution before starting the entire work.
If any mineral deposits have clogged the nozzle head, this technique should fix the issue by removing the deposit.
But if this trick isn’t working, you should move ahead with the full replacement.
Learn What Faucet Type You’re Using
Type 1: The first sort of kitchen faucet is the centre set. These faucets usually have multiple handles. It also houses cold and hot water valves. Further, it incorporates a sprayer.
Type 2: Single handle kitchen faucets are the 2nd type. They come with an added sprayer too.
We hope that you’ve understood what sort of faucet you’re using and this understanding will help you in the next steps. Now let’s head to the detailed instructions.
Tool You'd Need for the Job
Here we’ll list all the instruments you’d be needing throughout the entire process. We’d recommend you bring all of them before you start the job. It’s always better to have all the essentials within your reach so you won’t have to run to the hardware store every few minutes into the work.
Here are the tools you should have:
- Specially designed sink wrench
- Basin wrench
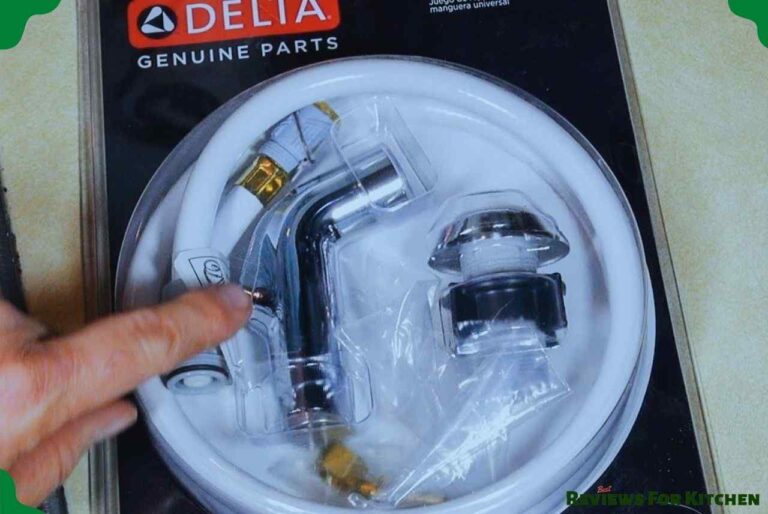
- A brand new sprayer replacement
- Different sorts of screwdriver/ screwdriver set
- Plumber putty
- Two channel type pliers
- One bucket
Stop the Water Supply
First, you’d have to turn the water supply off before you start working on the project. Close the shut-off valve under the sink to stop the water from running.
You can also stop getting the main water supply of your house. It’s crucial to stop the supply as it can flood your house if you work on the faucet with an open supply line.
Removing the Sprayer
Now, before you get a new sprayer hose installed, it’s time to remove the existing one. To do this, grip the brass connecting area using a wrench. Use the pliers to get the side nuts unscrewed.
Before unscrewing the side nuts, it’s essential that you hold the brass connecting steady or else you’d risk breaking the copper tube.
- Go down and find out the outlet tube and figure out the sprayer hose attached to it.
- Most probably, there’ll be a clip lock to secure the connection. Use a screwdriver or a similar tool to remove it and store it safely. You’d be needing that when you install a new sprayer.
- Use pliers to disconnect the mounting nut. While you’re doing it, the faucet body will turn. Try to grab and keep it stable while you’re removing the nut.
- Pull the old sprayer housing out using the deck fitting passage by cutting it.
- When you remove the hose, water will be coming out. So place your bucket underneath to collect the water, and the area is kept clean.
- Remove the rest of the faucet parts from faucet nipple area. To detach the old fitting, disconnect and remove the existing jam nut.
- Pull it out or press down and slowly disconnect the connection. Whether you need to pull it out or press it down would depend highly on the sort of connection you have.
- Pull out faucets will have an extra weight attached to them. Remove the weight too.
Detaching the Sprayer Head
At this part, we’re going to look at how you can detach the sprayer head.
For Type 1 and 2
If you’re using the Type 1 or Type 2 kitchen faucets, use the techniques below:
- Turn the side nut into anticlockwise movements to loosen up the sprayer head.
- After doing it for a few seconds, the sprayer head will simply be removed. Keep it in a safe place.
But for some, it may not be as simple. If you’ve been using the faucet for some time, it can happen that build-ups have collected inside, and you’re not able to turn the side nut.
If that’s the case, create a water and vinegar solution by 1:1 ratio. And submerge the sprayer head in it for a certain duration. You should now turn the nut easily to get the head off.
For Type 3
If you’re using the type 3 faucet, you can follow the mentioned steps below:
- First, start by pulling the sprayer out
- Produce a loop using the pullout sprayer hose to not go back down.
- For sprayers with a quick-release, simply press on the designated switch to detach the spray head
- Detach the spray head using your basin wrench for sprayers with threaded connections.
- Get the sprayer out.
Check the Connection for Water Leakage
Leakages may exist in your connection, and before you head on to install the new faucet, it’s always better to check the entire connection out for any potential leakage areas.
Restart the water supply and start the faucet to check if any leaks can be noticed. If you find any leakage points, try applying silicone glues to prevent them.
Install Sprayer Hose
All the chores are done. You’ve successfully detached the old and faulty sprayer, and now is the time to start a fresh installation of the brand new sprayer. Check out the entire process and how it can be done in the steps mentioned below:
- Place the sprayer housing, moving the tailpiece through the mounting hole.
- This housing should come with a gasket. But in case it doesn’t have one, you can attach a plumber putty bead to seal the housing.
- Now, reconnect the hose with the sprayer head.
- If you have a type 1 or type 2 faucet, try putting the hose inside the sprayer hole.
- Do ensure the spray head is well in the correct place.
- Now, find out the outlet tube or the copper.
- For type 3 faucets, use the weight to place the sprayer hose.
- Finally, attach the hose with the copper or outlet tube.
- For the ones with crimp seals, use it to secure it.
- Tighten up the sprayer hose securing it with threads
- Try to use pressure on the housing to tighten it up.
- Slip the hose from deck fitting area and secure the nut as long as it’s not tight enough
- Run the faucet sprayer to see if the installation was alright
Well, your faucet sprayer hose should be installed by now.
Bottom Line
Well, by now, you should be done with the installation. Try to offer quality maintenance, so the faucet lasts longer than the previous one. You can offer easy cleaning using mild cleansers and damp clothes. You can also utilize window cleaners for the job.
Installation of the faucet may seem complex in some areas. If you’re not able to perform all the mentioned tasks, we recommend you to have a friend by your side who has a minimum understanding of how faucet fittings work. With our guide and a combined effort, you should be able to pull it off.
So, what are you waiting for? You now know how to replace delta kitchen faucet sprayer hose. So, ready your wrenches and start the installation process right now!
Related articles about kitchen faucet
- Kitchen Faucets Buying Guide | Complete Buying Guide
- How to replace a Kitchen Faucet | Replace it within an hour
- How to Fix a Leaking Kitchen Faucet in a Proper Way
- How to Clean Kitchen Faucet – Basic and Deep Cleaning Process
- Why Is The Water In My Faucets Brown And Cloudy?
- How to Repair Low Pressure in A Kitchen Faucet? – The Plumbing Solution
- How to Clean Delta Kitchen Faucet Head?
- How to Clean a Delta Pull Down Kitchen Faucet Aerator?
- How to Remove Aerator from Moen Kitchen Faucet? Unearth the Best Tricks!